Espresso has long captivated the minds of coffee lovers. It’s rich; it’s complex, it’s intense. It’s also a little confusing. Most enjoy their lattes and cappuccinos without knowing what espresso is. There’s no shame in that, but once you understand how espresso works, those drinks become a lot more enjoyable, and you can even learn to make them in your home.
The journey into the world of espresso is a rewarding one. When you become intimate with espresso, you become intimate with coffee. There’s also struggle and frustration - two keys to learning and understanding something on a deep level.
I want to take you on this journey. I want to share the beauty, joy, and mystery of espresso with you. I want you to be able to experience espresso how we do as coffee professionals, including making it yourself.
Espresso has been reinvented in the last ten years. It gets better and better every year, and we still only understand the tip of the iceberg. This guide will teach you to brew espresso with insight that wasn’t available even two years ago. If you stick with it, you will be on the forefront of espresso knowledge and progress.
With great determination and excitement, I give you: The Ultimate Guide to Espresso.
Read: What Makes Specialty Coffee Special?
First Thing First: Where Did Espresso Come From?
The Age of Steam in the 19th century led to developments in transportation, power generation, and eventually coffee. Cafe culture was booming in Europe, but coffee brewing was a slow affair. The first steam-powered coffee maker appeared around 1884, but it was little more than a quicker batch-brewer.
Milanese beverage gurus Luigi Bezzerra and Desiderio Pavoni improved upon the original steam-powered design and showcased the world’s first single-shot espresso maker at the 1906 World’s Fair in Milan. The machine used only about a fifth of the pressure that modern espresso machines used (it was using steam, after all) and produced watery, bitter coffee.
Espresso evolved rapidly over the next century as the technology became more and more refined, and its popularity spread across Europe and eventually the world.
What Is Espresso?
To explain what espresso is, you need to know what espresso is not. There are a lot of misconceptions out there, so let’s break a couple down.
Espresso is not a bean. Coffee beans are coffee beans. Any coffee bean can become espresso. Coffee bags are often labeled as “espresso beans” because they are the signature espresso blend of a coffee roaster, but this does not mean that the beans are somehow meant for espresso inherently.
Espresso is not a roasting style. Light roasted coffees are often extremely flavorful but can be less forgiving. Roasters are more likely to use darker roasts because they are easier to make decent espresso from and are more approachable to the average consumer.
Espresso, as a category, has almost nothing to do with the actual coffee bean. Light, dark, blend, single origin - all can become espresso. Here’s why:
Espresso is a brewing method. A shot of espresso is a concentrated form of coffee created by forcing hot water through super-fine coffee grounds at 7-10 atmospheres of pressure. An espresso machine is a technology that can achieve the required environment for espresso.
Some coffee shops serve shots of espresso that are 1oz large; others use recipes that produce 2oz. As long as its water being forced through very fine coffee grounds with intense pressure, it’s espresso.
What Does Espresso Taste Like?
There’s much more diversity in espresso flavor than most people realize. The usual idea is that espresso is acidic, bitter, and gross. That’s true, but only for poorly roasted coffee or poor technique. This is not how espresso is meant to be enjoyed.
Good coffee with good technique can produce a shot that is bursting with complex ripe flavors, satisfying sweetness, a syrupy body, and a smooth, lingering finish that leaves you wanting more.
Crema is the micro-foam of aromatic oils and air that sits on top of the liquid espresso. This portion of the shot is very acidic and intense in flavor and is often stirred back into the shot with a small spoon (though not always) to incorporate that experience into the fuller shot.
It’s a shame that we’ve grown used to poorly roasted coffee and terribly extracted espresso, but there’s hope. Coffee shops and roasters around the world are adopting better practices which are leading to tastier, more satisfying espresso.
Is Home Espresso Right For You?
Pulling these delicious shots of espresso in your home is not always easy, but it is always very satisfying. It requires some patience, a lot of practice, and the willingness to learn a few skills. But once you’ve got it down, those skills are easy to maintain.
Home espresso may be for you if:
- You want to make great espresso or espresso drinks at home
- You are focused and motivated enough to learn a few new skills
- You have some time to spare to learn these skills
- You want to be even more awesome
Home espresso may not be for you if:
- You just want a great cup of coffee
- You don’t want to think too much about your coffee brewing
- You don’t have the time to learn a few new skills
- You are too awesome already, to the detriment of your health
In my experience, there’s more effort involved in a great shot of espresso than there is in a great cup of coffee. Not by a ridiculous amount, but the difference is noticeable enough to discourage some people from investing in espresso equipment and skills.
If you think home espresso is a challenge you are ready to explore, then let’s move on!
Modern Espresso Equipment
An explosion in espresso innovation over the last decade has resulted in a variety of machine types and accessories. Looking at all the options can be daunting, so I’ve assembled some explanations and equipment suggestions to ease the burden.
Steam VS Pump Powered
Remember that first Milanese espresso machine that appeared at the World’s Fair? It was powered by generating a lot of steam and using it to force water through the coffee grounds. It didn’t get off the ground because it produced very bitter coffee - and modern steam machines suffer the same fate. Steam espresso machines do not generate enough pressure to compete with its pump-powered rivals.
Pump powered espresso machines vary in strength and size, but the mechanics are a major step above the steam model. Rather than producing unpredictable steam, these machines use water pumps that push water from a reservoir to the coffee. It’s predictable, consistent, and achieves the right amount of pressure for great espresso.
Automatic VS Semi-Automatic
Automatic espresso machines are kitchen marvels. They can grind coffee, pull shots, and give you a cup of espresso with a little tinkering. They are convenient and deliver a consistent experience, but they hold the wheel of the car. You are not the driver. The machine is.
This is great for anyone who likes to wake up to a shot of espresso without having to think, but this isn’t so great for anyone who gets excited by the idea of a great handmade espresso.
What if you don’t like the shot that the automatic machine pulls? What can you do? Almost nothing - you are left at the mercy of the pre-programmed mechanics. There are often a few settings that can be adjusted to toy with the result, but at that point, you might as well look into semi-automatic machines.
I imagine you’re reading this guide because you’re not interested in a fully-automated approach. I imagine you like to learn and develop new skills. I imagine you want to be in full control of your entire espresso experience. I imagine you would rather have a semi-automatic espresso machine.
Semi-auto machines don’t grind your coffee, which means you can set your grind setting and dry dose. These machines don’t have a pre-programmed shot time, which means you can pull shots for as long as you want until you find that sweet spot.
Having the ability to control your grind size and shot time is where the money is. Those two avenues of control are what will enable you to become intimate with espresso brewing.
Espresso Grinders
Your coffee grinder will make a bigger difference than your espresso machine. You can own a brand new, top of the line espresso machine, but if you don’t have a grinder that you can rely on, that machine won’t brew good espresso - no matter what you do.
Small and large coffee grounds extract at different rates. This isn’t always a big deal with brewed coffee, but we’re not working with brewed coffee. We’re working with a very concentrated form of coffee. If your grounds are extracting at different rates, you’ll be able to taste it.
Read: Conical VS Flat Burrs: What You Need To Know
With a reliable, consistent burr grinder, you will be able to take espresso by storm. Without one, you’ll be left guessing.
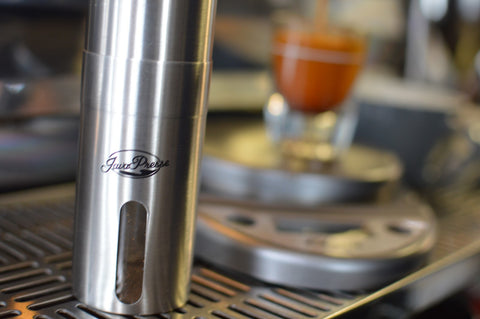
I invite you to check out our manual coffee grinder. It’s consistent, durable, portable, and delivers results that are impossible to beat for the price.
Tamp
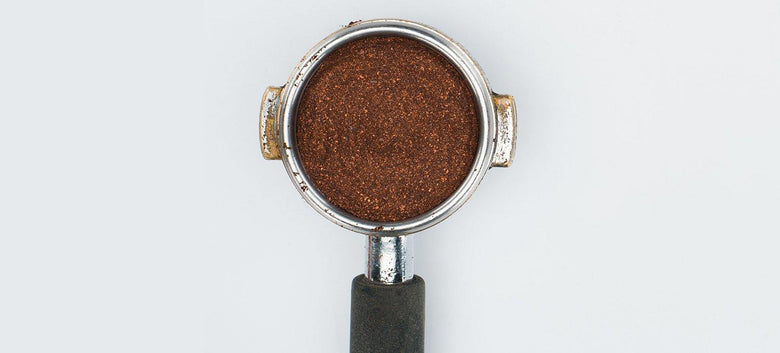
When you buy an espresso machine, it will almost certainly come with a tamp. Tamps are funny-shaped tools that compact the coffee grounds into a tight, level puck, which is necessary for balanced brewing.
Portafilter
Your chosen espresso machine will come equipped with its portafilter. These tools come in many sizes, holding up to 25g of coffee. Most lower-end machines tend to hold closer to 18g. Sometimes there are additional basket sizes to choose from.
Knock Box
These little things make disposing of used espresso pucks easy. Sometimes a bar is situated over a little box compartment. Sometimes a stationary bar can be set on top of a trash can. Either way, the function is the same: you knock the portafilter against the bar, and the coffee falls out.
Scale
Using a gram scale is one of the best ways to pull shots with consistency and accuracy. If you go by volume alone, you’ll always be guessing about how much espresso is really in your shot glass. Crema tends to take up different amounts of volume depending on how fresh it is and how finely ground the coffee grounds are, so it’s best to not rely on looks alone.
A scale is guaranteed way to elevate your coffee brewing.
Equipment Budget Levels
As long as you can afford to spend a couple of hundred dollars on your setup, you can achieve some great espresso. Each budget level comes with its challenges, but excellent espresso is never out of reach with the equipment I’ll suggest.
Under $500
You can achieve satisfying espresso for less than $500, but you may have to make some sacrifices and work around some challenges. Machines in this price range often are pretty simple and don’t come with many bells and whistles, such as temperature and time displays. These low-priced machines will need a minute or two between shots to refill with water and warm up.
Grinder: JavaPresse Hand Grinder - Affordable, Great Grind Consistency, Non-Electric
Machine: Gaggia Classic - Affordable, No-Frills, Dependable
Around $1,000
With a little more money to spend, you’ll be able to enjoy some of the luxuries that coffee shops do, such as accurate displays, electric grinders, and dual-boilers (for steaming and pulling shots at the same time).
Grinder: Baratza Sette 270 - Breakthrough Technology, Consistent, Micro-Adjustments
Machine: Breville Dual Boiler - Excellent Home Machine, Display, Great Steam Wand, Quality Parts
Above $1,500
If you’ve got a pretty large espresso budget, you’ll be able to enjoy some of the best home equipment the world has to offer. The real question is, how much do you want to spend? The $1,500 budget is more than enough to supply yourself with excellent espresso, and upgrades beyond this point may not be worth it. It’s up to you to decide!
Grinder: Baratza Sette 270W - Breakthrough Technology, Consistent, Micro-Adjustments, Bluetooth
Machine: Lucca A53 - Volumetric Dosing, Dual Boilers, Commercial-Quality Parts
How Espresso Extraction Works
Espresso (and all coffee) extraction works like this: hot water takes things from coffee grounds. Understand the stages of how this happens is one of the keys to unlocking power over your espresso.
In the first stages of extraction, the espresso is very concentrated and acidic. This is when most of the intense acids and flavors are drawn out in a golden brown stream. You don’t want to try those first few drops, though - they will be very overpowering and sour.
In the middle stages of extraction, the brighter flavors calm down, and mellow and smooth flavors begin to show themselves. The rate of extraction slows down, and the stream becomes a rich yellow. The sourness is slowly balanced out as mild compounds mingle with the acids.
In the final (yummy) stages of extraction, the deep nutty and chocolatey flavors appear and round out the bright, sour ones to create a well-rounded shot. The espresso reaches a level of concentration that is enjoyable (although still intense), and the stream becomes blonde in color.
When you pull a great shot that goes through the phases without stopping too early or going too long, you end up with a shot of espresso that is rich, ripe with flavor, has a crisp acidity, full mouthfeel, and a lingering, sweet finish.
Read: How To: Learn To Taste Coffee!
Here’s what happens if you don’t go through the stages correctly:
Underextraction is the result of not extracting enough from the coffee grounds. You did not reach that sweet spot where the shot is balanced, sweet, and enjoyable. Instead, your shot tastes sour, acidic, or even salty.
Overextraction is the result of extracting too much from the coffee grounds. You made it to that sweet spot and ran right past it. Overextracted shots have a muted sweetness, a hollow body, and a sad, bitter flavor.
Recipe Building and Pre-Steps
Now that you have a grasp of how espresso works on the extraction side, it’s time to put a real recipe together, based on those mechanics.
Fresh Coffee Always
There is no substitute for freshly roasted and freshly ground coffee. Coffee is an agricultural product and has the most flavor when it’s fresh out of the roaster. Most coffee folks say that coffee is considered fresh for two weeks after it’s roasted.
Another important factor is how long the coffee has been ground. The longer you have between grinding and brewing, the more aromatic flavors you loose. That’s a sad thing. Get yourself a nice burr coffee grinder so that you can keep your coffee as fresh as possible.
Only fresh coffee will be able to produce that crisp layer of crema.
Brewing Temperature
Similar to regular brewed coffee, the ideal temperature range for espresso is right around 200 degrees Fahrenheit, give or take a couple of degrees. The hotter the water, the quicker the coffee will brew.
Be Picky With Your Water
Using soft water is more important than ever with espresso. Not only will hard water throw off the taste of your hard work, but it will compromise the longevity of your espresso machine. Hard water is not a friend of espresso equipment, so be picky about your water source.
Tamping
Compacting the coffee grounds together to form a tight puck restricts the flow of water and forces the coffee and water to interact evenly. Without an even tamp, water would flow through the easiest path, instead of saturating the grounds evenly. 30 pounds of even pressure is what you want to be applying with your tamp.
Brewing Ratios
There’s a lot of wiggle room as far as ratios go. Most coffee shops use something close to 1 gram of coffee beans to 2 grams of water, a 1:2 ratio. Some shops like to stir the pot and use 1:1, some 1:5, some 1:3! For the sake of simplicity and ease, you should start off with a 1:2 ratio (1g of coffee per 2g water).
Read: How To: The Golden Ratio in Coffee Brewing
Just like with regular brewed coffee, there are a few things to keep in mind when playing with ratios:
- Each coffee ground needs a certain amount of water to extract enough from it to achieve that sweet, balanced shot. For brewed coffee, that gram ratio range is around 1:17. For espresso, the ratio sits closer to 1:2 (pressure lets us pull very concentrated shots that are still balanced).
- If a ground gets too little water, it won’t give away enough, and the result will be under extracted.
- If a ground gets too much water, it’ll give way too much, and the result will be over extracted.
The 1:2 ratio for espresso is reliable and easy to remember. I suggest sticking to it until you are very comfortable with tasting espresso.
In the coffee world, we like to refer to an amount of coffee grounds as the dry dose. We then refer to the yield espresso as the wet dose. For example, in this guide, we’ll use a 20g dry dose and shoot for a 40g wet dose.
Grind Size
Espresso, as a method, uses very fine coffee grounds. With a strong burr grinder, you can make micro-adjustments. These adjustments are so small that they can be very difficult to feel and see, but they can make a major difference to your espresso.
Here are the rules for coffee grind sizes:
- Smaller particles extract more quickly because it takes less time for water to interact with the innermost coffee cells. Smaller particles also have less space in between them and tend to reduce the water flow rate.
- Larger particles extract slowly but allow water to pass more easily because of larger spaces between the particles.
Making adjustments to your grind size is a powerful way to take control of your espresso. We’ll talk a little more about that later.
Read: Why Your Grinder Is The Most Important Piece of Coffee Gear
Pre-Infusion
There is a stage in espresso brewing that many coffee shops take advantage of called the pre-infusion. This stage involves saturating the coffee grounds with hot water for five to ten seconds before applying the full amount of pressure and water.
This practice helps distribute the grounds and releases carbon dioxide so that the brewing can take place. Both of these effects lend towards a more balanced, predictable brew.
A Note About Time
Time is a funny thing with coffee. For immersion methods such as the French press or Aeropress, time is something you actively manipulate. It’s variable you have power over. For pour over and espresso brewing, time is not a variable, but an indicator.
25-35 seconds is generally how long an espresso shot takes to go through its phases to reach that sweet spot. If you are pulling shots outside of that window (or close to the edges), you don’t need to adjust the time (that’ll adjust your wet dose!), you need to adjust something that affects the time.
A finer grind will reduce the flow rate, and it’ll take longer to achieve your target wet dose. A coarser grind will increase the flow rate and decrease the time it takes to reach the wet dose.
Don’t play with time as if you can control extraction with it. Use it to let you know if your grind size is right or needs adjusting.
How To Make Espresso: A Step-By-Step Guide
It’s finally time to pull shots of espresso with your home equipment. Now that you’re aware of how espresso extraction works, this is the easy part. This is how you should always begin:
- Fresh Coffee In The Grinder
- Fully Heated Espresso Machine
- Inserted Portafilter
- Dry Tamp
- Shot Glass (or Mug) Available
- Timer
- Gram Scale
Avoid leaving your portafilter on the drip tray or counter for long. You don’t want it to cool down and keep your espresso from brewing at the right temperature.
Take the portafilter out of the machine and wipe the inside so that there’s no moisture.
Tare the portafilter on a scale and then grind 20g of coffee directly into it. If your portafilter doesn’t fit on the scale, use a small cup or bowl.
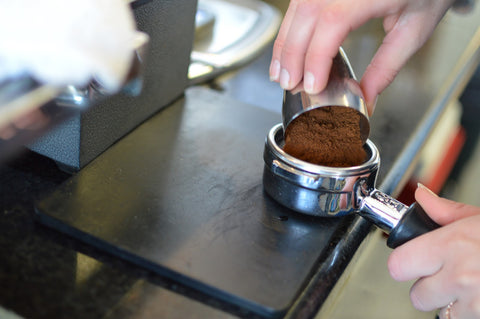
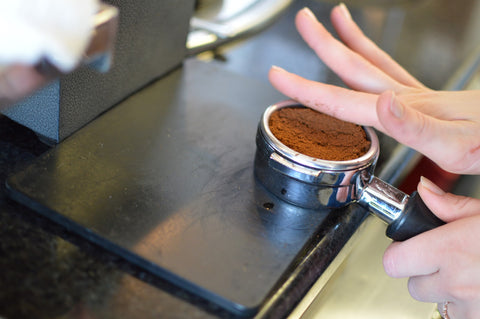
Use a flat surface (such as your finger) to swipe along the coffee grounds, leveling the coffee bed. Give the portafilter a good, level tap against the counter to help distribute the grounds.
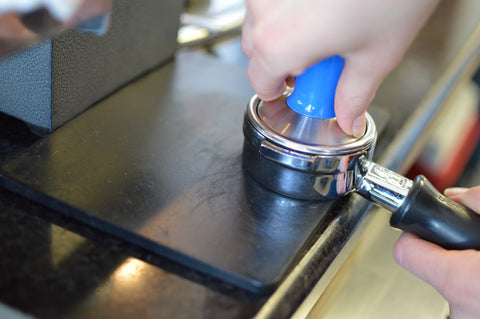
Hold your tamp like you would a doorknob and set it on top of the coffee in the portafilter. Feel the edges with your fingers to make sure it’s setting on there evenly. Using the point of your thumb and the side of your pointer finger, press down on the coffee grounds with about 30 pounds of force (should take some effort, but not stress you out).
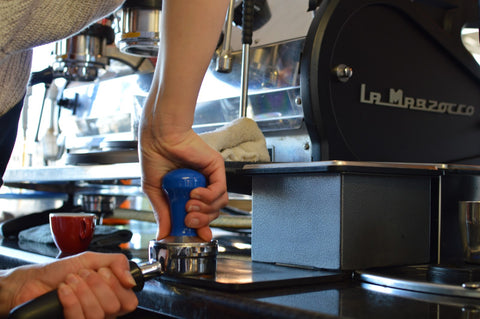
It’s important that during this action, your wrist remains aligned with your arm. You shouldn’t be pushing with your palm or feeling a lot of tension in your wrist at all. Your forearm and upper arm will form a 90-degree angle if you do this correctly. I tend to turn my body left and tamp with my right hand to make things easier.
Check to make sure your tamp is level and insert the portafilter back into the espresso machine.
If your machine gives you the option to pre-infuse, do that for about five seconds. If not, flip the paddle or hit the button and let the process begin.
Start a timer. Tare a shot glass on your gram scale and set it under the portafilter.
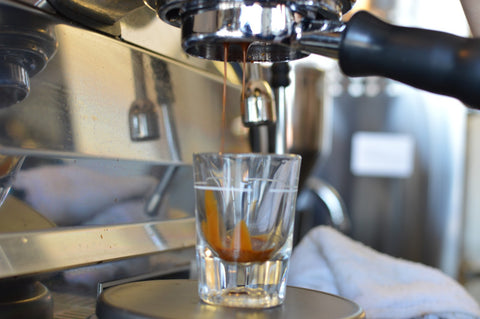
Watch the golden streams of liquid espresso flow from the portafilter. Watch your scale - we are shooting for about 40g (1:2 ratio). Watch your timer - 30 seconds will probably do.
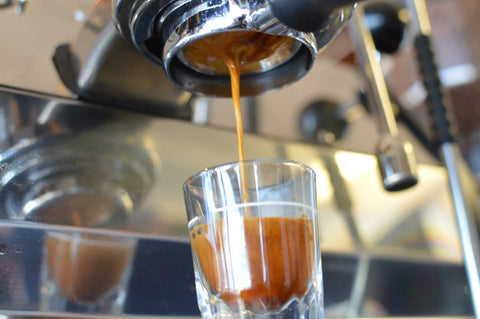
When the wet dose approaches 40g, turn the shot off or remove the scale and shot glass from the stream. A thick crema should form on top as the layers separate.
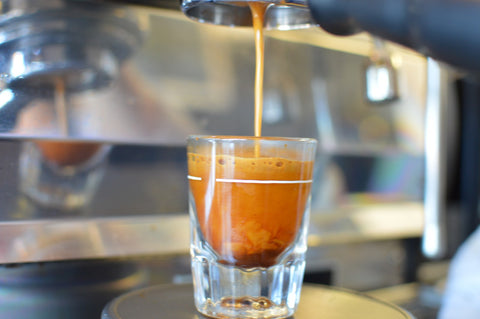
Pour the shot into your drinking vessel and enjoy.
Dialing In For Better Espresso
You take that first sip of espresso, and it seems a little off, not quite as good as you had hoped. Let’s go back to the recipe. The key to a better shot is almost always in the recipe.
Dry Dose
I suggest changing the dry dose (20g in this guide) rarely, if ever. It is a dependable variable that you can control easily, so it’s best to leave it in one spot and work with the others.
Wet Dose
The perfect 1:2 ratio would mean you end up with a 40g wet dose, but sometimes making the best espresso requires ignoring the ratio a bit. This variable is a very easy one to manipulate, so it’s the one I suggest working with first.
If your shot is over extracted (bitter, muted, astringent), you need to extract less. The easiest way to do that is to reduce the wet dose, thereby reducing the amount of extracted espresso reaching your shot glass.
If your shot is under extracted (sour, acidic, salty), you need to extract some more. The easiest way to do that is to simply let the shot run longer to achieve a higher wet dose, and thus more extraction.
Make wet dose adjustments about 2 to 4g in size, depending on how severely the extraction needs to be adjusted.
Here’s an example: you taste a shot that pulled 40g in 30 seconds and notice it tastes a bit too bitter for your liking. You pull another shot that reaches 36g in 28 seconds, and it tastes sweeter and smoother. By reducing the wet dose, you extracted less and achieved an excellent shot.
Grind Size (part 2)
Changing the grind size isn’t necessary if you only need minor changes to your espresso. Remember that the grind size greatly impacts flow rate, so if you grind the coffee more finely next time, the shot will take longer; if you grind them more coarsely, the shot will run faster.
The usual scenario for grind size adjustments is when a shot pulls in your target ratio, but not close to your target time. For example, you pull a shot that reaches your target wet dose of 40g in 18 seconds. You decide to let it run a little longer for more extraction (because 18 seconds is rarely long enough) and cut the shot off at 46g in 20 seconds.
Here, adjusting the wet dose won’t be able to help. The coffee grounds still need 5+ seconds to brew, but the wet dose is already well beyond your target. You need to fine the grind.
A finer grind will cause the flow rate to slow down. Depending on your adjustment, your next shot could take 25 or 30 seconds, which is fare more likely to taste delicious.
Cleaning
A dirty machine, portafilter, tamp, or towel can throw off a good shot. Keeping your tools clean isn’t difficult, as you’ll discover in the next section.
It’s important to remember that there is no perfect shot of espresso. Every person has their preferences and practices. The best shots are the ones you enjoy the most.
Caring For Your Espresso Machine
Don’t skip this section! If you want your espresso machine to supply you with delicious espresso for years and years, you need to take care of it.
The first and most important thing to do is this: don’t use hard water. Ever. The calcium in hard water will eat at the insides of your machine and eventually cause it to fail. This is an expensive problem to have and can be avoided by using filtered or purified water only. Trust me on this one. Your machine will live a long life, your espresso will taste incredible, and your wallet will thank you.
Secondly, coffee grounds that sit in your espresso machine will continue to dispense oils all over the place. These oils taste good in espresso, but over time they coagulate, begin to throw off flavor, and clog the dispersion screen and portafilter. To avoid this, you need to do two things.
- Clean out the coffee grounds after each shot. Don’t leave the puck sitting in there. Rinse the portafilter very well and wipe the dispersion screen with a clean towel. Easy.
- Don’t ignore the flush instructions provided by your espresso machine manual. Every machine will have slightly different instructions, so read them carefully. Dedicated espresso cleaners will be able to break down the oils and leave you with a clean, crisp machine.
If you use your steam wand, wipe it immediately to make sure dried milk doesn’t get stuck to the wand. Seriously, it will get stuck - and that’s gross.
Go Forth And Conquer
There’s much to learn by playing with your espresso machine that cannot be grasped by reading alone. Play and explore. Get to know your machine. Grab yourself a suitable coffee grinder. Remember that the true “God Shot” doesn’t exist. The best shot is the one you like the most.
Welcome to the incredible, challenging, rewarding, frustrating, and delicious world of espresso. Embrace the journey.
